

Plastic granulators are the workhorses of the recycling and manufacturing industries, tirelessly transforming bulky plastic waste into reusable, manageable granules. But like any critical piece of machinery, their peak performance and longevity depend heavily on consistent, proactive maintenance. Neglecting your granulator doesn’t just lead to poor performance; it can result in costly downtime, compromised output quality, and even safety hazards.
This comprehensive guide is designed for industrial equipment purchasers making investment decisions, engineers optimizing production lines, and the technical personnel responsible for day-to-day operations. We’ll delve into the why and how of regular granulator care, providing practical tips to keep your machine running efficiently and safely for years to come.
Why Regular Maintenance is Non-Negotiable
Investing time and resources into a structured maintenance program for your plastic granulator yields significant returns:
- Maximize Lifespan and ROI: Preventive maintenance catches small issues before they become major failures, extending the operational life of your equipment and protecting your initial investment.
- Ensure Consistent Output Quality: Sharp knives, clean screens, and proper machine calibration are essential for producing uniform granules that meet quality specifications. Dull knives or clogged screens lead to inconsistent particle sizes, fines, and potentially unusable material.
- Boost Operational Efficiency & Reduce Downtime: A well-maintained granulator runs more smoothly, consumes energy more efficiently, and is far less likely to experience unexpected breakdowns that halt production.
- Enhance Workplace Safety: Regular checks on safety guards, emergency stops, electrical connections, and blade integrity are crucial for preventing accidents and ensuring a safe working environment.
Understanding Your Granulator: A Quick Overview
While designs vary, most plastic granulators share core components involved in the size reduction process:
- Hopper: Where plastic scrap is fed into the machine.
- Cutting Chamber: The heart of the granulator, housing the rotor and knives.
- Rotor: A rotating assembly fitted with rotary knives.
- Rotary Knives (Fly Knives): Mounted on the rotor, these knives perform the initial cutting action as they pass stationary bed knives.
- Bed Knives (Stationary Knives): Fixed knives mounted within the cutting chamber. The precise gap between rotary and bed knives is critical for efficient cutting.
- Screen: Located beneath the cutting chamber, the screen has specific hole sizes that determine the final granule size. Material stays in the chamber until it’s small enough to pass through.
- Drive System: Typically an electric motor connected via belts or a direct drive, powering the rotor.
- Collection Bin/Evacuation System: Collects the sized granules discharged through the screen.
(Visual Suggestion: A simple labelled diagram showing these core components and the material flow path would be highly beneficial here.)
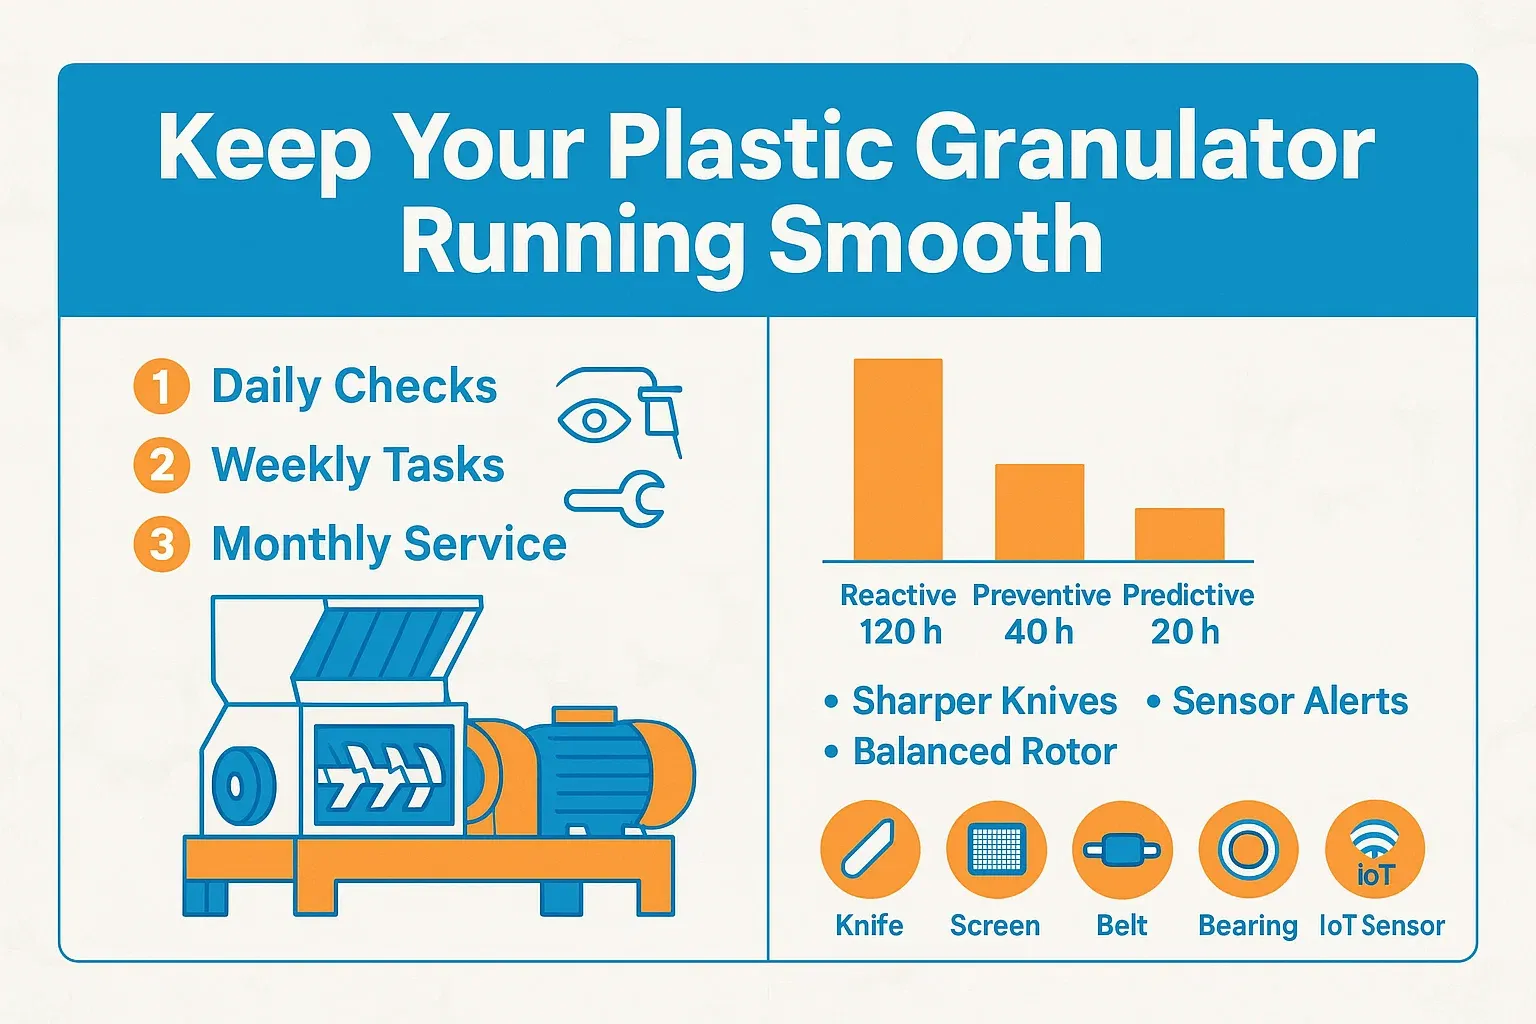
Your Granulator Maintenance Checklist: A Scheduled Approach
A structured schedule is the key to effective maintenance. Adapt this template based on your specific machine, operating hours, and the type of material being processed:
(Visual Suggestion: A table summarizing the Daily, Weekly, Monthly, and Semi-Annual/Annual checks would make this section easy to scan and use.)*
Daily Checks (Before/During/After Each Shift):
- Visual Inspection: Look for loose bolts, fluid leaks, or obvious damage to guards and chutes.
- Listen: Note any unusual noises (grinding, rattling, excessive vibration) during operation.
- Check Hopper: Ensure it’s clear of obstructions and foreign objects (metal, rocks).
- Cutting Chamber (Post-Shift): Briefly inspect for material build-up or large jammed pieces (ensure machine is fully stopped and locked out first!).
- Collection Bin: Empty as needed to prevent backups.
- Safety Features: Verify emergency stops are accessible and guards are securely in place.
Weekly Inspections:
- Knife Inspection: (Requires proper lockout/tagout) Check rotary and bed knives for dullness, chips, or cracks. Note wear patterns.
- Screen Inspection: Check for damage (cracks, warping) and blinding (clogging). Clean if necessary.
- Drive Belts: Check tension and look for signs of wear (cracking, fraying). Adjust or replace as needed.
- Bearing Lubrication (if applicable): Grease bearings according to manufacturer specifications. Do not over-grease!
- Fasteners: Check critical bolts (especially knife bolts and screen bolts) for tightness.
- General Cleaning: Clean accessible areas of the machine exterior and surrounding area.
Monthly Maintenance:
- Thorough Cleaning: Deep clean the cutting chamber, screen, and collection area. Material build-up can cause heat and wear.
- Knife Gap Check: Verify the gap between rotary and bed knives is within manufacturer specifications. Adjust if necessary. This is crucial for cutting efficiency.
- Bearing Check: Listen closely to bearings (with machine off, manually rotate if possible) for roughness or noise. Check for overheating during operation (use an infrared thermometer if available).
- Electrical Connections: Visually inspect control panels and motor connections for loose wires or signs of overheating (discoloration). Only qualified personnel should perform electrical work.
- Safety Interlocks: Test safety switches and interlocks to ensure they function correctly.
Semi-Annual/Annual Overhauls:
- Knife Sharpening/Replacement: Rotate or replace knives based on wear observed during weekly/monthly checks. Always replace knives in sets and ensure they are properly balanced. Consider professional sharpening services.
- Bearing Replacement: Replace bearings based on manufacturer recommendations, operating hours, or signs of wear.
- Drive System Service: Thoroughly inspect motor, couplings, and potentially replace drive belts even if they look okay, based on hours.
- Screen Replacement: Replace worn or damaged screens. Consider having spares on hand.
- Full Machine Inspection: A comprehensive check of the machine’s structure, welds, and all components.
Deep Dive: Key Maintenance Tasks Explained
- Blades (Rotary & Bed Knives): The Cutting Edge
- Importance: Sharp, properly gapped knives are paramount for efficiency, granule quality, and reduced energy consumption. Dull knives tear rather than cut, creating fines, increasing heat, and straining the motor.
- Tasks: Regular inspection for wear/damage, maintaining the correct cutting gap (refer to manual), timely sharpening or replacement. Always handle knives with extreme care using appropriate PPE.
- Screens: The Sizing Gatekeepers
- Importance: The screen ensures uniform granule size. Clogged or damaged screens reduce throughput and affect quality.
- Tasks: Frequent inspection for clogging (blinding) and physical damage. Clean thoroughly using brushes or compressed air. Replace immediately if cracked or significantly worn.
- Bearings: Keep Things Rolling
- Importance: Rotor bearings support heavy loads and high speeds. Failure can cause catastrophic damage.
- Tasks: Follow the manufacturer’s lubrication schedule (type and frequency). Avoid over-lubrication, which can also cause overheating. Monitor for noise and temperature changes.
- Drive System (Belts/Motors): Power Transmission
- Importance: Ensures power is efficiently delivered to the rotor. Loose belts slip, reducing performance; overly tight belts strain bearings and shafts.
- Tasks: Regularly check belt tension and alignment. Inspect for wear and tear. Ensure motor cooling vents are clear.
Troubleshooting Common Granulator Problems (and how maintenance helps)
(Visual Suggestion: A simple table format would be ideal here.)*
| Problem | Potential Maintenance-Related Cause | Maintenance Solution |
| Poor Cut Quality / Fines | Dull knives, incorrect knife gap, clogged screen | Sharpen/replace knives, adjust gap, clean/replace screen |
| Reduced Throughput | Dull knives, clogged screen, loose drive belts | Sharpen/replace knives, clean screen, tension belts |
| Excessive Noise/Vibration | Loose knives/bolts, failing bearings, unbalanced rotor | Tighten fasteners, inspect/replace bearings, check knives |
| Motor Overheating | Dull knives, material build-up, incorrect voltage | Sharpen knives, clean machine, check electrical supply |
| Machine Jamming | Feeding too fast, dull knives, foreign objects | Adjust feed rate, sharpen knives, clear obstructions |
Safety First: Lockout/Tagout and Best Practices
Maintenance tasks, especially those involving the cutting chamber, MUST only be performed after the machine is completely de-energized and locked out/tagged out (LOTO) according to your facility’s established procedures.
- Always follow LOTO procedures before any maintenance.
- Never reach into the hopper or cutting chamber while the machine is running or energized.
- Wear appropriate Personal Protective Equipment (PPE), including safety glasses, cut-resistant gloves (especially when handling knives), and hearing protection.
- Ensure all guards are securely replaced before restarting the machine.
- Keep the area around the granulator clean and free of clutter.
The Importance of Quality: OEM Parts & Professional Service
While aftermarket parts might seem cheaper initially, using Original Equipment Manufacturer (OEM) parts is often the best long-term strategy. OEM parts are designed specifically for your machine, ensuring proper fit, material quality, and performance. This is particularly critical for knives, screens, and bearings.
For complex repairs or diagnostics, don’t hesitate to contact the manufacturer or a qualified service technician. Their expertise can save time, prevent further damage, and ensure repairs are done correctly and safely.
Conclusion: Invest in Maintenance, Reap the Rewards
Your plastic granulator is a vital asset. Treating its maintenance as a priority, not an afterthought, is crucial for maximizing its efficiency, lifespan, and the quality of its output. By implementing a consistent maintenance schedule focusing on knives, screens, bearings, and safety checks, you protect your investment, ensure smooth production, and maintain a safer workplace. Remember, proactive care is always less expensive and disruptive than reactive repairs.